

This guide explains the science in plain English, teaches you the technique that matters, and walks through ten beginner-safe exercises for every major muscle group. There is also a straightforward UK buyer guide at the end to help you choose the right roller without overspending.
What’s in This Guide
What Foam Rolling Actually Does
Foam rolling is a form of self-myofascial release — a technique that applies sustained pressure to the soft tissue surrounding your muscles (the fascia) to reduce tension, improve blood flow, and increase the range of motion at nearby joints. The term sounds clinical, but the principle is the same as a sports massage: sustained pressure on tight tissue encourages it to relax and lengthen.
The fascia is a continuous layer of connective tissue that wraps around every muscle, organ, nerve, and bone in the body. When we sit for long periods, train hard, sleep in one position, or carry physical or postural stress, the fascia can develop areas of restriction — commonly felt as tight spots, “knots,” or an uncomfortable pulling sensation when you stretch. A foam roller lets you apply targeted, sustained pressure to these areas using your own bodyweight, without needing a massage therapist or specialist equipment.
Foam rolling vs stretching: These are complementary, not interchangeable. Static stretching lengthens the muscle fibres themselves. Foam rolling works on the connective tissue (fascia) surrounding the muscle. Both matter for flexibility and movement quality, and many physiotherapists recommend combining the two: foam roll first to release fascial tension, then stretch to improve muscle length.
The Science: What the Research Shows
The evidence base for foam rolling has grown substantially over the past decade. A widely cited 2019 meta-analysis published in Frontiers in Physiology found that post-exercise foam rolling reduced perceived muscle soreness by around 6% and improved sprint recovery by 3.1% compared to passive rest. A separate body of research consistently shows improvements in joint range of motion following foam rolling — particularly at the hip and knee — without the temporary reduction in muscle force output that static stretching can produce when done before exercise.
The NHS lists foam rolling under general guidance for managing common muscle and back pain at home, alongside heat, ice, and gentle movement. NICE’s 2022 osteoarthritis guidelines similarly emphasise self-managed exercise and mobility work as a first-line approach. Foam rollers are standard equipment in NHS physiotherapy departments and sports medicine clinics across the UK, used for rehabilitation, post-surgical recovery, and athlete maintenance.
The honest caveat, noted directly by Physioworx (an NHS supplier): foam rolling may help some people feel less stiff, move more comfortably, and engage better with their exercise programme — but it is not a cure-all. The benefits are real but modest, and consistency of use matters far more than which specific roller you own or how aggressively you use it.
Four Technique Rules That Change Everything
Most beginners use a foam roller incorrectly — too fast, too hard, and without pausing where it matters. These four rules, used consistently, make the difference between useful self-massage and an uncomfortable experience that gets abandoned after a week.
Rule 1: Roll Slowly — About 2–3cm Per Second
Fast rolling is the most common mistake. Moving quickly generates friction and surface-level sensation but does not allow the pressure to penetrate the fascia and trigger the release response. Roll at roughly the pace of a slow exhale — around 2–3cm per second. It will feel more productive and more uncomfortable in the right way almost immediately.
Rule 2: Pause on Tender Spots for 20–30 Seconds
When you find a tight or tender area (you will know it when the pressure causes a “good pain” sensation — uncomfortable but not sharp), stop rolling and hold the pressure in place for 20–30 seconds. This sustained compression is what triggers the myofascial release response. The discomfort should reduce noticeably during those seconds as the tissue relaxes. If it does not reduce at all, move to a lighter roller or reduce the amount of bodyweight you are applying.
Rule 3: Breathe Continuously — Do Not Hold Your Breath
It is instinctive to hold your breath when you encounter a tender spot, but doing so increases overall muscle tension, which works against the release you are trying to achieve. Breathe slowly and deliberately throughout. A long exhale as you hit a tight spot is the most effective cue — it directly reduces the nervous system’s tension response and helps the tissue relax under pressure.
Rule 4: Control the Pressure — Use Your Arms and Legs
You do not need to put your full bodyweight on the roller to get results. In most exercises, your arms or free leg act as a support, allowing you to adjust exactly how much pressure you apply. Beginners should start with significantly less than full bodyweight and build gradually. The goal is a 6–7 out of 10 on a discomfort scale — clearly felt, but not so painful that you tense up or cannot breathe steadily.
10 Beginner Foam Roller Exercises, Step by Step
The following exercises cover the major muscle groups most commonly affected by tension from desk work, exercise, or everyday physical stress. Each takes 60–90 seconds per side. Work through them in the order shown for a full-body session, or choose individual exercises to target specific areas.
Thoracic Spine (Upper and Mid Back)
Targets: Upper back, mid back, erector spinae
60–90 seconds · No side change needed
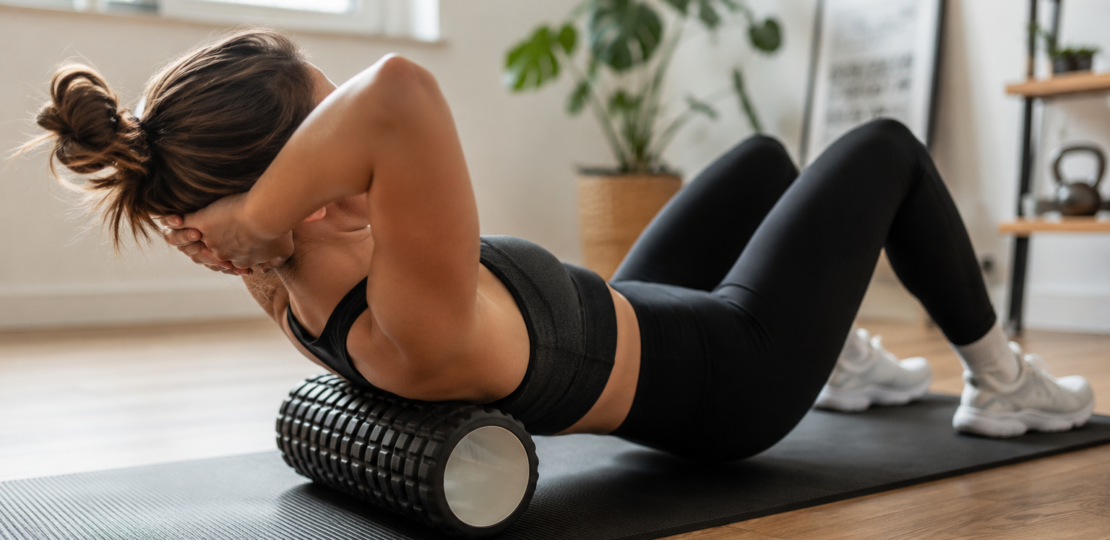
One of the most universally beneficial foam roller exercises, particularly for anyone who sits at a desk. The thoracic spine (the section of the back between your neck and lower back) commonly becomes stiff and rounded from prolonged sitting, leading to shoulder tension and poor posture. Rolling it out improves extension mobility and is generally safe and comfortable even for complete beginners.
- Sit on the floor with your knees bent and feet flat. Place the foam roller horizontally behind you at the level of your shoulder blades.
- Cross your arms over your chest or place your hands behind your head for neck support. Lower your upper back gently onto the roller.
- Use your feet to slowly walk yourself forward, rolling from the shoulder blades down to the mid back. Stop just above the lowest rib — do not roll the lower back (lumbar spine).
- When you find a stiff or tender segment, pause for 20–30 seconds. Allow the back to gently extend over the roller as the muscles relax.
- Continue slowly rolling up and down within the thoracic region for 60–90 seconds total.
Quadriceps (Front of Thigh)
Targets: Rectus femoris, vastus lateralis, vastus medialis
60–90 seconds each side
The quadriceps are among the most commonly tight muscle groups in the UK population, particularly for those who sit for extended periods and for runners, cyclists, and gym-goers. Tight quads contribute to knee pain and anterior pelvic tilt (the forward tilting of the pelvis that causes lower back discomfort).
- Begin in a forearm plank position facing the floor. Place the roller under your front thighs, just above the knee.
- Support your weight on your forearms, keeping your core engaged and back flat.
- Slowly roll the foam roller from just above the knee up toward your hip crease, then back down. Take 3–4 seconds in each direction.
- When you find a tender spot (common on the outer quad or in the middle of the thigh), pause for 20–30 seconds.
- To increase intensity, shift your weight slightly to roll one leg at a time. To reduce intensity, keep both legs on the roller and support more weight through your arms.
IT Band and Outer Thigh
Targets: Iliotibial band, tensor fasciae latae, vastus lateralis
60–90 seconds each side
The iliotibial (IT) band is a thick band of connective tissue running along the outer thigh from the hip to the knee. IT band tightness is extremely common among runners, cyclists, and those who spend long periods seated with legs crossed, and it is a frequent contributor to lateral knee pain. This is one of the most effective but initially most intense foam roller exercises for beginners.
- Lie on your side with the foam roller positioned under your outer thigh, just below the hip.
- Support your upper body on one forearm, with your top leg bent and foot flat on the floor in front of you for stability and pressure control.
- Use your supporting arm and top foot to slowly move the roller from just below the hip down toward the knee. Do not roll directly over the knee joint.
- Pause on any tender spots for 20–30 seconds. The outer thigh is commonly very sensitive on first use — use your top leg to take some weight off the roller if needed.
- Roll from hip to just above the knee, then repeat on the other side.
Hamstrings
Targets: Biceps femoris, semitendinosus, semimembranosus
60–90 seconds each side
Tight hamstrings are one of the most common physical complaints among UK adults, contributing to lower back pain, posterior pelvic tilt, and reduced hip mobility. They are frequently tight in people who sit for most of the working day, as sitting maintains the hamstrings in a shortened position for prolonged periods.
- Sit on the floor with both legs extended in front of you. Place the foam roller under your thighs, just above the knee.
- Support your weight on your hands placed slightly behind your hips.
- Use your hands to lift your hips slightly and roll slowly from just above the knee up toward the base of your glutes.
- To focus on one leg at a time, cross one ankle over the opposite knee. This shifts significantly more bodyweight through the working leg.
- Pause on any tender spots for 20–30 seconds. Roll slowly back and forth for the full 60–90 seconds.
Calves
Targets: Gastrocnemius, soleus
60–90 seconds each side
Calf tightness is among the most common complaints from runners and those who wear heeled shoes regularly, contributing to Achilles tendon tension, plantar fasciitis, and reduced ankle dorsiflexion. The calves respond well to foam rolling, with most users noticing an improvement in ankle range of motion within a few sessions.
- Sit with both legs extended. Place the foam roller under your lower legs, just above the ankles.
- Support your weight on your hands placed slightly behind you.
- Lift your hips slightly and roll slowly from just above the ankle up to just below the back of the knee.
- To increase intensity, cross one ankle over the other to focus on a single leg at a time.
- Rotate your lower leg slightly inward and outward as you roll to cover the full width of the calf muscle.
Glutes and Piriformis
Targets: Gluteus maximus, gluteus medius, piriformis
60–90 seconds each side
Glute and piriformis tightness is a very common contributor to lower back pain, sciatic-type discomfort, and reduced hip mobility. The piriformis muscle in particular (a small external rotator deep in the glute) is notorious for compressing the sciatic nerve when tight, causing the “piriformis syndrome” that affects many desk workers and runners. Foam rolling this area is one of the most effective things many people can do for persistent lower back and hip discomfort.
- Sit on the foam roller with your weight on one glute. Cross the ankle of the working side over the opposite knee (forming a figure-4 shape).
- Lean slightly toward the working side to focus the pressure on the glute and piriformis of that leg.
- Use your supporting hand on the floor behind you for balance and pressure control.
- Slowly tilt your body to explore different areas of the glute, pausing on any tender spots for 20–30 seconds.
- Roll for 60–90 seconds per side, then switch legs.
Hip Flexors
Targets: Iliopsoas, rectus femoris, tensor fasciae latae
60–90 seconds each side
Tight hip flexors are almost universal among people who sit for long periods, and they are a major contributor to anterior pelvic tilt, lower back pain, and restricted hip extension. Foam rolling the hip flexors is less intuitive than rolling the major muscles on the back or sides of the leg, but it is one of the most valuable techniques for desk workers and sedentary lifestyles.
- Begin in a plank position facing the floor. Place the foam roller under your hip flexor — the front of the hip, roughly where your leg meets your torso.
- Allow your weight to settle into the roller. Support yourself on your forearms with the opposite leg bent and foot on the floor beside you.
- Make small movements — slightly forward, slightly back, and slightly side to side — to explore the hip flexor area. Do not roll back and forth aggressively.
- When you find a tender spot, pause for 20–30 seconds and breathe steadily. Gently bending and straightening the working leg slowly can intensify the release.
- Repeat on the opposite side.
Upper Trapezius and Base of Neck
Targets: Upper trapezius, levator scapulae, cervical extensors
60–90 seconds · No side change needed
Tension at the base of the neck and top of the shoulders (the upper trapezius region) is the most common physical complaint among UK office workers. This exercise is a gentle, effective way to release that chronic holding pattern. It requires particular care regarding technique — the neck itself should never be rolled directly.
- Lie on your back and position the foam roller horizontally at the top of your upper back, roughly at shoulder blade height.
- Interlock your hands behind your head to support the weight of your neck. Keep your chin gently tucked toward your chest.
- Gently tilt your head to one side to target the trapezius on that side. Apply only the weight of your head — do not press with your hands.
- Make only small, exploratory movements. Hold any tender spots for 20–30 seconds.
- Return to centre, then tilt to the opposite side.
Latissimus Dorsi (Lats)
Targets: Latissimus dorsi, teres major
60–90 seconds each side
The latissimus dorsi are the large, wing-shaped muscles of the mid and lower back. They attach to the upper arm and often become tight in people who train with weights (particularly pulling movements), swimmers, and those with rounded shoulder posture. Tight lats restrict shoulder mobility and can contribute to shoulder impingement symptoms.
- Lie on your side with the foam roller positioned under your armpit, at the side of your torso.
- Extend the bottom arm overhead, palm facing up. The roller should sit in the space between your shoulder and your ribs on that side.
- Use your top hand on the floor in front of your chest and your top foot for stability.
- Slowly roll from the armpit region down toward the mid back. Pause on any tender spots for 20–30 seconds.
- Repeat on the opposite side.
Thoracic Rotation Opener
Targets: Thoracic spine rotators, intercostal muscles, obliques
5–8 rotations each side · Slow and controlled
This is a mobility exercise rather than a standard rolling movement — it uses the foam roller as a support to improve thoracic rotation, which is frequently restricted in people who sit for long periods and contributes to neck pain, shoulder tension, and lower back strain. It is the ideal finishing exercise for a foam rolling session.
- Lie on your right side with the foam roller positioned vertically behind your spine, running parallel to your body.
- Stack your hips and knees at 90 degrees (the foetal position). Extend both arms out in front of you at shoulder height, palms together.
- Keeping your hips still and your bottom hand on the floor, slowly rotate your upper body to the left, following your top hand with your eyes as your arm sweeps open toward the floor behind you.
- Allow the back of your hand and arm to reach the floor (or as close as your range allows). Breathe out as you open.
- Slowly return to the starting position and repeat 5–8 times on each side.
A Simple 12-Minute Beginner Routine
Full-Body Foam Rolling Routine — 12 Minutes
- Thoracic spine — 90 seconds
- Upper traps / neck base — 90 seconds
- Lats — 60 seconds each side
- Hip flexors — 60 seconds each side
- Glutes and piriformis — 60 seconds each side
- Quads — 60 seconds each side
- IT band / outer thigh — 60 seconds each side
- Hamstrings — 60 seconds each side
- Calves — 60 seconds each side
- Thoracic rotation opener — 5–8 reps each side to finish
Use this routine after a workout for recovery, or on its own on rest days to maintain mobility. Three to four sessions per week produces meaningful benefits within four to six weeks. One session per week maintains mobility and reduces soreness. As the Physioworx NHS supplier guidance notes, if you do not notice any meaningful benefit after four to six weeks of consistent practice, it is worth consulting a physiotherapist to identify whether a different approach may be more effective for your specific situation.
What to Avoid — and When Not to Foam Roll
Never roll directly on these areas:
The lower back (lumbar spine) — rolling directly on the lumbar vertebrae compresses the spinal joints and discs. Roll the glutes, hamstrings, and hip flexors to relieve lower back tension indirectly.
The neck (cervical spine) — the vertebrae of the neck are not designed to tolerate the compression forces of foam rolling. Use the technique shown in Exercise 8 with hands supporting the neck at all times.
Bony prominences — knees, elbows, ankles, and the hip bones (greater trochanter). Roll the muscles above and below joints, not over the joint itself.
Any area of acute injury, bruising, open wounds, or inflammation — foam rolling an acutely injured area can worsen the injury and delay healing. Wait until the acute phase has resolved.
When to Consult a Professional First
If you experience sharp, shooting, or radiating pain (particularly into an arm or leg) during foam rolling, stop immediately and seek advice from a physiotherapist or GP before continuing. Radiating symptoms may indicate nerve involvement that requires clinical assessment rather than self-treatment. Similarly, if you have osteoporosis, a recent fracture, a blood clotting disorder, or are taking blood thinners, consult your GP or physiotherapist before using a foam roller.
UK Buyer Guide: How to Choose the Right Foam Roller
The foam roller market in the UK is full of options that look similar but perform very differently. The following guidance covers the four decisions that actually matter, followed by specific product recommendations.
Density: The Most Important Decision
Foam roller density determines how much pressure is applied to the tissue and how intense the sensation is. This is the most important buying decision for beginners, and the one most frequently misjudged.
| Density | Feel | Best For |
|---|---|---|
| Soft (EPE / white foam) | Forgiving, gentle pressure | Complete beginners, very sensitive areas, elderly users, those returning from injury |
| Medium (EVA foam) | Firm enough to be effective, not punishing | Most beginners and regular home users — the recommended starting density |
| High density (EVA/polypropylene) | Firm and intense | Experienced users, athletes, those who have built tolerance over several months |
As Physioworx’s NHS guidance notes, beginners often press too hard and use too firm a roller, which causes them to tense against the discomfort — the opposite of what effective myofascial release requires. A medium-density roller is suitable for most general users and is usually much easier to tolerate than very firm options. This is the density to start with.
Length: Short vs Long Rollers
A 90cm roller allows you to lie with your entire spine supported, which is ideal for thoracic mobility work, balance exercises, and Pilates-style movements. A 30–45cm roller is easier to store, more portable, and sufficient for targeted work on the calves, quads, hamstrings, and glutes. For most home gym users with limited storage space, a 45cm medium-density roller covers all the exercises in this guide.
Surface Texture: Smooth vs Grid Pattern
Smooth rollers provide consistent, even pressure across the contact surface. Grid or textured rollers (featuring channels, ridges, or nodules) provide varied pressure intensities, with the ridges mimicking the fingers and palms of a massage therapist. Grid rollers are generally more effective for experienced users targeting specific trigger points. For beginners, a smooth or lightly textured surface is usually more comfortable and equally effective for the exercises in this guide.
What Not to Buy
Very soft foam (white EPE polystyrene) degrades quickly and is typically too soft to produce useful myofascial release for people with average or above-average body weight. Very hard textured rollers (like the Rumble Roller with aggressive knobs) are frequently too intense for beginners and can cause bruising or muscle soreness if used incorrectly. Vibrating foam rollers do offer some additional perceived-pain reduction through neurological distraction, but the evidence for meaningfully superior recovery outcomes over standard rollers is not yet established, and the £80–190 price premium is difficult to justify as a first purchase.
Recommended Foam Rollers for UK Beginners
Best Overall — Most Trusted in UK Gyms
TriggerPoint GRID 1.0 Foam Roller
Medium–High Density EVA
Multi-Density Grid Surface
Hollow Core (Durable)
Widely Available in UK Retail
The TriggerPoint GRID 1.0 is described by PNEUX as the best-selling foam roller in the UK and by OutdoorGearLab as the best all-round roller after testing 14 models. Its patented Distrodensity grid surface mimics the varying pressures of a massage therapist’s hands and fingers, covering the three most-used pressure intensities in one surface. The hollow polypropylene core withstands years of daily use without losing shape — common in gym environments where budget foam rollers crush flat within months. TechGearLab describe it as “firm enough to give a great massage while being cushioned enough not to hurt.” It is available at Amazon UK, Sweatshop, JD Sports, and Decathlon. The main caveat for complete beginners: the grid pattern can feel intense on day one. Build up gradually with low body weight on the roller initially.
Best for Very New Beginners — Most Comfortable Start
Decathlon Domyos 500 Foam Roller
Soft EPE Density
Smooth Surface
Available In-Store at Decathlon UK
Very Affordable
Flexa.fit’s UK-specific beginner buyer guide recommends soft-density smooth rollers as the most appropriate starting point for people who are genuinely apprehensive about foam rolling discomfort, or who have heightened sensitivity. The Decathlon Domyos 500 is the most affordable option in UK retail that sits at the correct density for that profile. It will not last as long as the TriggerPoint under heavy daily use, but as a no-commitment starting point to discover whether foam rolling suits you before investing further, it is a sensible choice.
Best for Full Spine Work and Thoracic Mobility
Sportneer 90cm High-Density Foam Roller
Medium–High Density EVA
Smooth Surface
Whole Spine Can Lie Supported
A 90cm roller allows the entire spine to lie supported at once, enabling thoracic extension mobility work and balance exercises that a short roller cannot accommodate. Physioworx notes that 90cm rollers are particularly useful for whole-body exercise, balance work, and Pilates-style movements. The Sportneer is a well-reviewed UK option in this size at an accessible price. Recommended for users who primarily want to work on posture and thoracic mobility, or for those who plan to use the roller for Pilates-style floor exercises alongside the exercises in this guide.
Best Budget Option — Amazon UK
Amazon Basics High-Density Foam Roller
High-Density EVA
Smooth Surface
Strong Durability for Price
The Amazon Basics foam roller is described by Reviewed.com as a “decent starter roller” and by PNEUX as the best budget option in the UK. The high-density EVA foam maintains its shape better than white EPE budget rollers, making it more durable under regular use. The smooth surface provides consistent, even pressure that suits beginners learning technique. Available in 30cm and 61cm lengths on Amazon UK at a price that makes it an easy first purchase. For buyers who want a reliable and unpretentious starting point without paying a premium for brand or texture, this is the honest recommendation.
Key Takeaways
Foam rolling is most effective when done slowly, with pauses on tender spots, while breathing steadily. Speed, intensity, and an expensive roller matter far less than consistency and correct technique.
For most UK beginners, a medium-density 45cm roller — such as the TriggerPoint GRID 1.0 or the Amazon Basics — covers all the exercises in this guide at an appropriate intensity. Very sensitive beginners may prefer starting with a soft Decathlon Domyos roller before progressing.
Three to four sessions per week of 10–15 minutes produces meaningful improvements in perceived soreness, mobility, and range of motion within four to six weeks. The research confirms the benefits are real — modest, but real — and the only thing that determines whether you notice them is whether you actually do it regularly.
Shop Foam Rollers on Amazon UK
Disclosure: BrightLivingUK is a participant in the Amazon Associates UK programme. We may earn a small commission if you purchase through our links, at no extra cost to you. This helps keep the site running — thank you for your support!